Using IUserPanelMenuFactory in Plug-ins
Goal
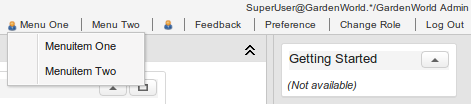
The goal of this tutorial is to show how to use the IUserPanelMenuFactory service in your plug-in project. Use this service to add custom entries to the WebUI user panel (the menu that contains Feedback, Preference, Change Role, and Log Out).
Prerequisites
Before you start, review the following tutorials:
Workflow
Step 1: Create a plug-in
Create a new plug-in (or use an existing one). In Eclipse, go to File > New > Other, select Plug-in Project from the Plug-in Development section, and follow the wizard. Make sure the OSGi framework is set to Equinox.
Step 2: Implement IUserPanelMenuFactory
Create a class that implements IUserPanelMenuFactory:
package org.evenos.menutest;

import org.adempiere.webui.factory.IUserPanelMenu;
import org.adempiere.webui.factory.IUserPanelMenuFactory;

public class MenuFactory implements IUserPanelMenuFactory {

    @Override
    public IUserPanelMenu getImplementation() {
        return null;
    }

}
Step 3: Create a component definition
Go to File > New > Other and select Component Definition from the Plug-in Development section. Give it a unique name.
In the component definition, provide a unique name (use reverse domain notation, e.g. org.evenos.menutest.menufactory). Select your MenuFactory class, add a service.ranking integer property with a value > 0, and on the Services tab select org.adempiere.webui.panel.IUserPanelMenuFactory as a provided service.
The resulting XML will look like this:
<?xml version="1.0" encoding="UTF-8"?>
<scr:component xmlns:scr="http://www.osgi.org/xmlns/scr/v1.1.0" name="org.evenos.menutest.menufactory">
   <implementation class="org.evenos.menutest.MenuFactory"/>
   <service>
      <provide interface="org.adempiere.webui.factory.IUserPanelMenuFactory"/>
   </service>
   <property name="service.ranking" type="Integer" value="100"/>
</scr:component>
Step 4: Implement IUserPanelMenu
Create another class that implements IUserPanelMenu:
package org.evenos.menutest;

import org.adempiere.webui.factory.IUserPanelMenu;
import org.adempiere.webui.panel.UserPanelMenu;
import org.zkoss.zk.ui.Component;
import org.zkoss.zk.ui.event.Event;

public class MenuImplementation implements IUserPanelMenu {

    @Override
    public void onEvent(Event event) throws Exception {
        // TODO Auto-generated method stub
    }

    @Override
    public UserPanelMenu[] getMenus() {
        // TODO Auto-generated method stub
        return null;
    }

    @Override
    public void setComponent(Component component) {
        // TODO Auto-generated method stub
    }

}
Return an instance of this class from your factory:
public class MenuFactory implements IUserPanelMenuFactory {
    @Override
    public IUserPanelMenu getImplementation() {
        return new MenuImplementation();
    }
}
Step 5: Define menu IDs and implement getMenus()
Use private static final strings for menu IDs. In getMenus(), create UserPanelMenu objects and return them. UserPanelMenu provides static factory methods for menus with images, without images, or without a name label:
private final static String MENU_ONE_ID = "org.evenos.menu.one";
private final static String MENU_TWO_ID = "org.evenos.menu.two";
private final static String MENU_THREE_ID = "org.evenos.menu.three";

@Override
public UserPanelMenu[] getMenus() {
    UserPanelMenu menu1 = UserPanelMenu.get(
            MENU_ONE_ID,
            Msg.getMsg(Env.getCtx(), MENU_ONE_ID),
            "desktop-header-font link",
            ThemeManager.getThemeResource("images/BPartner10.png"),
            "Tooltip 1");
    UserPanelMenu menu2 = UserPanelMenu.getWithoutImage(
            MENU_TWO_ID,
            Msg.getMsg(Env.getCtx(), MENU_TWO_ID),
            "desktop-header-font link",
            "Tooltip 2");
    UserPanelMenu menu3 = UserPanelMenu.getWithoutName(
            MENU_THREE_ID,
            "desktop-header-font link",
            ThemeManager.getThemeResource("images/BPartner10.png"),
            "Tooltip 3");
    return new UserPanelMenu[] { menu1, menu2, menu3 };
}
Store the component for later use in event handling:
private Component component;

@Override
public void setComponent(Component component) {
    this.component = component;
}
Step 6: Add a popup menu (optional)
Create a popup menu in the constructor:
private Menupopup myMenu;

private final static String MENU_ITEM_ONE_ID = "org.evenos.menuitem.one";
private final static String MENU_ITEM_TWO_ID = "org.evenos.menuitem.two";

public MenuImplementation() {
    myMenu = new Menupopup();
    Menuitem mi = new Menuitem(Msg.getMsg(Env.getCtx(), MENU_ITEM_ONE_ID));
    mi.setId(MENU_ITEM_ONE_ID);
    myMenu.appendChild(mi);
    mi.addEventListener(Events.ON_CLICK, this);
    mi = new Menuitem(Msg.getMsg(Env.getCtx(), MENU_ITEM_TWO_ID));
    mi.setId(MENU_ITEM_TWO_ID);
    mi.addEventListener(Events.ON_CLICK, this);
    myMenu.appendChild(mi);
}
Step 7: Implement onEvent()
Handle menu button clicks in onEvent():
@Override
public void onEvent(Event event) throws Exception {
    if (event.getTarget().getId().equals(MENU_ONE_ID)) {
        if (myMenu.getPage() == null) {
            component.appendChild(myMenu);
        }
        myMenu.open(event.getTarget(), "after_start");
    } else if (event.getTarget().getId().equals(MENU_TWO_ID)) {
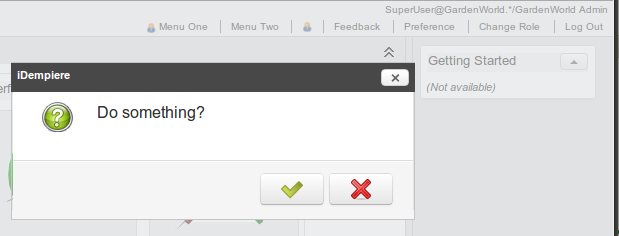
        FDialog.ask(0, component, "Do something?", new Callback<Boolean>() {
            @Override
            public void onCallback(Boolean result) {
            }
        });
    } else if (event.getTarget().getId().equals(MENU_THREE_ID)) {
        System.out.println("Menu three pressed");
    } else if (event.getTarget() instanceof Menuitem) {
        Menuitem mi = (Menuitem) event.getTarget();
        if (MENU_ITEM_ONE_ID.equals(mi.getId())) {
            System.out.println("Menuitem one pressed");
        } else if (MENU_ITEM_TWO_ID.equals(mi.getId())) {
            System.out.println("Menuitem two pressed");
        }
    }
}
Step 8: Create messages and test
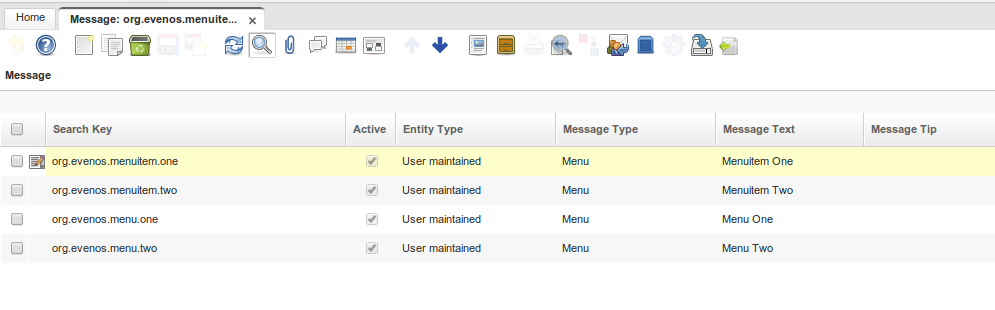
Log in as System Administrator and create message entries for each menu ID in the Message window:
After a cache reset (Process: Cache Reset) and re-login, you should see your new menu entries:

Troubleshooting
- Make sure the plug-in is loaded and started correctly.
- If you use a custom theme, make sure
theme/<themename>/zul/desktop/header.zulis loaded and uses theUserPanelclass. If you have a customUserPanelimplementation, make sure it loads additional menus inaddAdditionalMenus().